
This is a technique we learnt at 1/4 training and I love it! I ran some very vanilla throught the BS with the manhattan flower folder and using the de-bossed side (so the lines that are raised are facing down), take your brayer and very lightly cover some of the image in a light colour. I used daffodil delight, then using a darker colour, I used rose red do the same thing-just brayering very lightly until you have the desired look. I mounted this onto some rose red dsp and very vanilla card stock and stamped the greeting from curly cute in rose red, cut out a point and added a library clip. This was raised onto the card with dimentionals.

Hello, I have had a few days off from blogging and have enjoyed the lovley sunny days and cool nights we have been having. I had dinner at a friends house on Saturday with some other people and we got the karaoke out-with big speakers and everything, and we sang our hearts out till 2 in the morning!!! It was such good fun. Anyway, here is what I have been upto making...


I have used theclearly for you stamp set here and I stamped the large rectangle image in pink pirouette and then the bird image in basic grey over the top. This was then punched out with the extra large oval punch and I added a couple of tiny pearls to it. I ran some basic grey card stock through the big shot with the perfect polka dots folder and mounted this onto regal rose. I cut some dsp for lap of luxury and used the scallop trim border punch on some daffodil delight and then simply glued this underneath the dsp for effect. I pierced a hole in the dsp for my clear brad to fit through, and added some pear pizazz seam binding ribbon to complete it! I left the card with no sentiment however one would fit quite nicely on the dsp to the bottom right! Bye for now xxx
Category:
0
comments
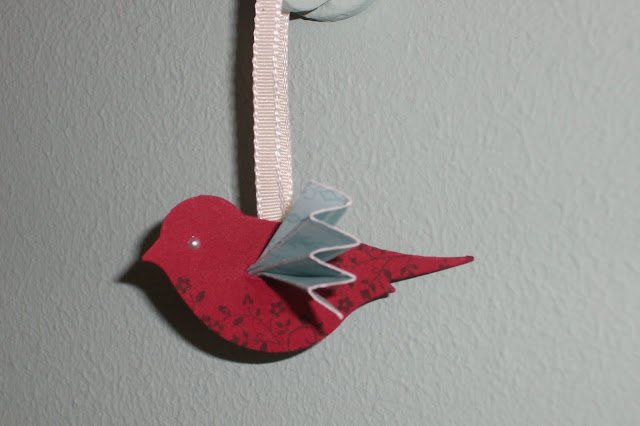
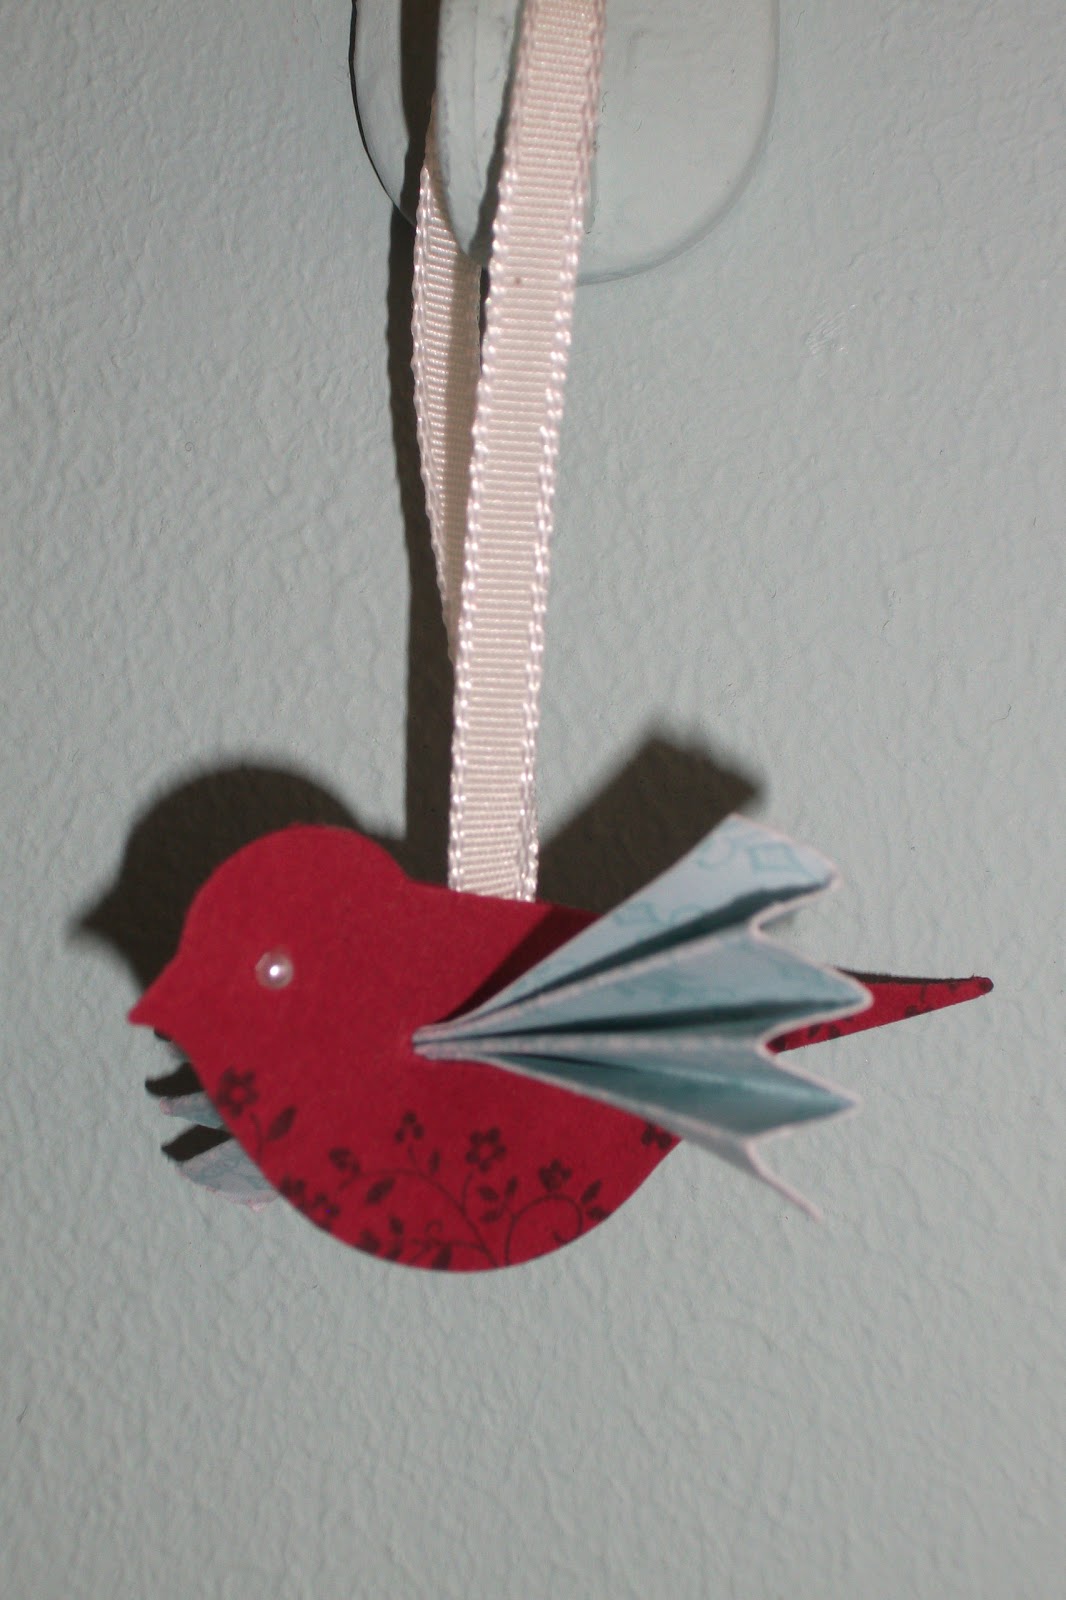
Hi there, today I am sharing this cute little 3D bird I made. I punched out two of the birds in cherry cobbler and made an opening with my paper piercer wide enough for some folded dsp to fit through.

I used the floral image from Tiny Tags and stamped randomly on each side of the bird. I cut some dsp and folded it to make a 'fan' type of design, snailed each inside part of the birds and then fed the dsp through each gap in the bird. I cut some very vanilla ribbon and positioned so the bird can hang from it. I put 2 small pearls on for the eyes, there you have it!
I used the floral image from Tiny Tags and stamped randomly on each side of the bird. I cut some dsp and folded it to make a 'fan' type of design, snailed each inside part of the birds and then fed the dsp through each gap in the bird. I cut some very vanilla ribbon and positioned so the bird can hang from it. I put 2 small pearls on for the eyes, there you have it!

Category:
2 step bird punch,
Tiny Tags
0
comments

I had my first 1/4 meeting on Saturday and learnt so much from my SU! mummy, Elaine Harding, so watch this space for new projects!! My card today is a masking technique using the scraps from the Big Shot TopNote and brayering. I overlaped the scrap piece of card stock (which had been run through the top note die) over some glossy card stock and brayered in Bashful Blue and then in Pink Pirouette and finishing in Rose Red to create a sky line effect. In black staz on I stamped the berry and butterfly image from Clearly For You then removed the mask. I used the corner rounder punch for the corners of the card. On whisper white I stamped the sentiment from the same set along with some other images also from the same set. I used the extra large oval punch and a button and added 3 jewelry punches with images from Tiny Tags. I glued these ontop of each other and added a gem.

Category:
b,
Big Shot Machine,
Brayering,
clearly for you,
extra large oval punch,
Jewelry Tag punch,
Masking,
Scallop Trim Border Punch,
Tiny Tags,
Top Note Die
0
comments
I am loving the Clearly For You set as it's so elegant and pretty. Today I am sharing this little creation with you...
 I used very vanilla as my base and ran it through the big shot with the perfect polka dots embossing folder. I used some baja brezze dsp and some cherry cobbler card stock which I punched with the scallop trim border punch. I ruffled some pear pizazz seam binding ribbon which was stuck onto sticky strip, then I stamped the cute little birds in Marina Mist (loving this colour!) and with my markers, I coloured the berries and leaves and stamped close to the birds.
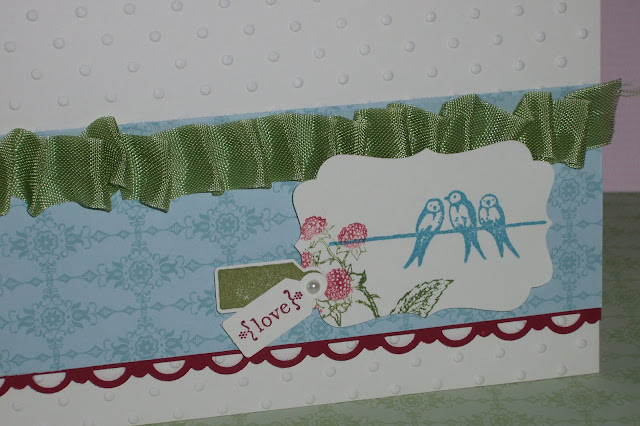
I punched this out with beautiful decorative label punch and finished it with two jewelry tag punched out images of the 'love' sentiment in cherry cobbler ink and the solid tag image in old olive ink with a pearl to complete it. Thanks for looking xxx


I punched this out with beautiful decorative label punch and finished it with two jewelry tag punched out images of the 'love' sentiment in cherry cobbler ink and the solid tag image in old olive ink with a pearl to complete it. Thanks for looking xxx
Category:
Big Shot Machine,
clearly for you,
Decorative Label Punch,
Jewelry Tag punch,
Perfect Polka Dots,
Tiny Tags
1 comments
Today I am sharing a cute little Birthday card, I have used crumb cake as my card base and stamped the sentiment from curly cute in certainly celery onto whisper white and cut to size with my paper trimmer. I cut out the end with my paper snips to make it interesting-as this is quite a popular look at the moment!! I put a little pearl at the end for detail. I ran some rich razzleberry through the big shot in the Manhattan flower embossing folder and adhered with the tombow glue. Then I tore some dsp from the newsprint set and glued underneath along with some razzleberry card stock which had been prettied up with the scallop trim border punch.
 To complete this card I added some pear pizazz seam binding ribbon and tied it in a knot and added the message '4 you' from tiny tags and the floral image both punched out with the jewelry punch, adhered to the card using a dimentional and a pearl. I added some shimmer spray but it doesn't show up in the photo. Thanks for looking ;) x

Category:
Big Shot Machine,
curly cute,
Jewelry Tag punch,
Manhattan Flower Embossing Folder,
Scallop Trim Border Punch,
shimmer spray,
Tiny Tags
0
comments
Today I am sharing the most CUTEST thing I have seen for a long time!! An owl made from punch art and the Big Shot Top Note. I think I saw this on Dawnsstampingthoughts which she had posted from someone elses creation. This is what I love about Stampin' Up! as you can share all your creations with everyone and get inspired all the time! So, here you go...
 Oh my gosh....isn't he just adorable??!! I used soft suede card stock for the top note and just cut this is half for the face. I punched put 2 birds from the large 2 step bird punch and used this for the ears in soft suede again, for the eyes I used the 1 3/8" circle punch in crumb cake, 1 1/4" circle punch in baja breeze and the 1" circle punch in early espresso. For the eye lids I used the 1 3/8" circle punch and cut it in half out of soft suede card stock. For the nose I used the heart 2 heart punch and also for his feet too in crumb cake. For the body, I punched 2 scallop circles in soft suede and 1 in crumb cake. I sponged all the edges before glueing this all together and then ran some very vanilla through the big shot in the perfect polka dots embossing folder. I glued this onto a crumb cake card base.
 I added the cute little hello sentiment from tiny tags, stamped in baja breeze and punched it out with the jewellry tag punch and added a little pearl. I added a few leaves from the 2 step bird punch and finished him off with a spritz of glimmer spray, which is some the champagne shimmer paint mixed with some alcohol solution! Let me know what you think of him!! Bye for now xxx


Category:
1 1/4" circle punch,
1 3/8 circle punch,
1" circle punch,
2 step bird punch,
Big Shot Machine,
Heart 2 Heart punch,
Jewelry Tag punch,
Perfect Polka Dots,
Scallop circle punch,
Tiny Tags,
Top Note Die
0
comments


Category:
Decorative Label Punch,
Four Frames,
Manhattan Flower Embossing Folder,
Oval All,
Scallop Edge Punch
0
comments
The new masculine stamp sets in the new mini are so lovely and I had to play with the motorcycle stamp! I used cherry cobbler as my main card stock, I stamped the image in Black Staz on onto whisper white card stock and then mounted it onto basic black card stock. I cut some dsp from the newsprint set and glued with snail, I used the curly label punch and wild wasabi dsp from the subtles stack and adhered underneath the black card stock.

I glued all this down and added a button from the subtles pack and cut a very thin strip of cherry cobbler card stock and threaded it through the button and tied very gently. I used a mini glue dot to adhere this. I finished off with the aqua painter and cherry cobbler ink on the metal parts of the bike. Then to add the wow to it, I added crystal effects over the painted parts. It doesn't show up too well in the photo but it really looks good!! Until tomoz, by for now x

I glued all this down and added a button from the subtles pack and cut a very thin strip of cherry cobbler card stock and threaded it through the button and tied very gently. I used a mini glue dot to adhere this. I finished off with the aqua painter and cherry cobbler ink on the metal parts of the bike. Then to add the wow to it, I added crystal effects over the painted parts. It doesn't show up too well in the photo but it really looks good!! Until tomoz, by for now x
Category:
Crystal Effects,
Curly Label Punch,
Designer Buttons,
Motorcycle
0
comments
I haven't had chance to post in the last few days as all my new toys arrived and I have been buried alive in gorgeous stamps sets, ink pads, DSP, punches and....THE BIG SHOT!! Yes, it is finally here and I have wanted to get my paws on this for like, ever!!
I held my first workshop on Thursday and had a great time demonstrating all the above to them and as a Thank you for them coming I made some little gifts for them. I made the Thank you one for my sweet upline Elaine Harding, as she came to help me out on my first workshop!

I used crumb cake as a card base, a strip of wild wasabi, a small stip of cherry cobbler and more mustard for the scallop trim border punch. I ran the sweet very vanilla ribbon down the dsp strip and used the decorative label punch and four frames set for the thank you sentiment (from occasional greetings) to sit in. I finished off using my aqua painter to colour the roses with cherry cobbler ink and the leaves with old olive. Cute! Bye for now x
I held my first workshop on Thursday and had a great time demonstrating all the above to them and as a Thank you for them coming I made some little gifts for them. I made the Thank you one for my sweet upline Elaine Harding, as she came to help me out on my first workshop!

My in-laws (to be one day!) have a wonderful Belgium Chocolate shop in Cambridge and I gifted up 4 chocs per cello bag and used the top note for the topper and the devine four frames stamp set and the new decorative label punch. They went down very well with the ladies!
It was my birthday last month so I needed to make some Thank you cards for family who had sent me nice gifts. The Big Shot was perfect for this!! I was inspired by the mini for the layout of the following card. I used the stunning Vintage Wallpaper embossing folder for this card and just ran 3/4 of it through the folder to create the desired effect here.

I used crumb cake as a card base, a strip of wild wasabi, a small stip of cherry cobbler and more mustard for the scallop trim border punch. I ran the sweet very vanilla ribbon down the dsp strip and used the decorative label punch and four frames set for the thank you sentiment (from occasional greetings) to sit in. I finished off using my aqua painter to colour the roses with cherry cobbler ink and the leaves with old olive. Cute! Bye for now x
Category:
Big Shot Machine,
Decorative Label Punch,
Four Frames,
Scallop Trim Border Punch,
Top Note Die,
Vintage Wallpaper Embossing Folder
0
comments
Hi all and Happy Mothers Day to each and every Mother out there! I had the cutest card from my little boy today with a wonderful drawing of me inside it!! So cute.
I am waiting for my delivery of things from THE NEW MINI!!!!! Yes its finally here and there is SO much in it I can hardly wait to start stampin'. Finally THE BIG SHOT is here and with so many dies to choose from, you will be spoilt for choice. I seriously can not wait for this as it's something i have longed for for years now! While you wait for my new arrivals have a look at some cards I have been inspired to make from catherinepooler.com
 This is a cute little pinwheel card that is perfect for all the girlie birthdays coming up! I used Basic grey card stock and the DSP from Lap of Luxury. I cut a 3x3 piece of DSP and folded from corner to corner making score lines into the middle. I then cut into each score line, stopping beofe I got to the middle, using the paper piercer i made a hole in the centre and then with the crop-a-dile, punched 4 small holes in each bottom right hand corner. I used a clear brad and then fed each hole through the brad and finally through the middle hole. (It's easier when you watch the video that catherine pooler made!) I attatched the pinwheel with glue dots and used the 'for you' greeting from occasional greetings and punched it out with the tab punch. I used the scallop edge punch for the top piece of DSP and it was finished off with the sweet pretty in pink ribbon.
 Next I used the Newsprint DSP (again this card is CASED from catherinepooler.com) I cut strips and glued them onto basic black cards stock in a way that they mis-matched slightly. I then punched out the bicycle with the 1 3/8" circle punch and then used the scallop circle punch and did the little twist on it to get the extra punched out bits. I put dimentionals onto it and added the sentiment from occasional greetings and inked it in whisper white! Love these cards but can't take any credit from them! x
I am waiting for my delivery of things from THE NEW MINI!!!!! Yes its finally here and there is SO much in it I can hardly wait to start stampin'. Finally THE BIG SHOT is here and with so many dies to choose from, you will be spoilt for choice. I seriously can not wait for this as it's something i have longed for for years now! While you wait for my new arrivals have a look at some cards I have been inspired to make from catherinepooler.com


Category:
1 3/8 circle punch,
Scallop circle punch,
Tab Punch
0
comments